The claim that Nordic walking burns 20% more calories is only true if you master the physics of pole propulsion; otherwise, your poles are just dead weight.
- Dragging your poles instead of actively pushing off negates the entire upper-body workout and added calorie burn.
- Correct hand technique (the “grip and release”) is not optional; it’s essential for power transfer and preventing wrist strain.
Recommendation: Focus first on the backward push and open-hand follow-through. This single change is what activates the 90% muscle engagement and unlocks the full metabolic benefit of the sport.
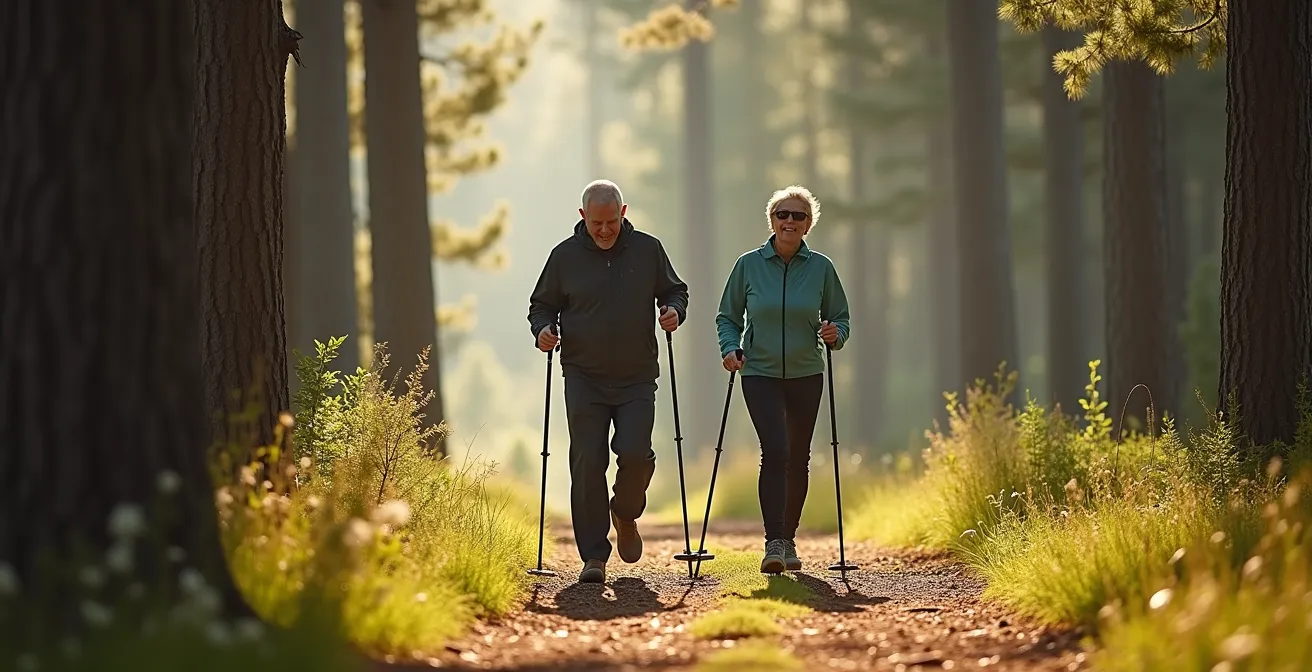
You’ve seen them in parks and on trails: active adults striding with purpose, poles in hand. The buzz around Nordic walking often centers on a compelling statistic: it can burn significantly more calories than regular walking or hiking. This makes it a seemingly perfect choice for seniors and active individuals seeking effective, low-impact cardio that’s gentle on the knees. Many people assume the benefits come simply from moving your arms along with your legs.
The common wisdom suggests you just grab a pair of poles and your regular walk is instantly upgraded into a full-body workout. But what if this isn’t the full story? What if the promised metabolic boost isn’t automatic? The truth is, a vast number of enthusiasts unknowingly leave that benefit on the table. The poles, intended to be engines of propulsion, often become little more than cumbersome accessories. The difference between a casual stroll with sticks and a true Nordic walking workout lies in a few crucial, yet often overlooked, technical details.
This article moves beyond the generic advice. We will dissect the mechanics that unlock the full potential of Nordic walking. We will explore why simply dragging your poles is a wasted opportunity, how to adapt your technique for different terrains, and how to choose the right equipment for your needs. By understanding the “why” behind the movements, you can transform your walk from a simple leg exercise into a powerful, calorie-torching, and joint-friendly fitness routine.
For those who prefer a visual demonstration, the following video breaks down the fundamental steps of Nordic walking technique, providing a great complement to the detailed analysis in this guide.
text
To help you master this activity, this guide is structured to address the most critical aspects of technique, equipment, and training. Discover how to turn every walk into a more effective and enjoyable workout.
Summary: Mastering the Full Potential of Your Nordic Walking Workout
- Why Dragging Your Poles Ruins the Upper Body Workout Benefit?
- How to Adjust Pole Techniques When Moving from Asphalt to Trails?
- Carbon Fixed or Aluminum Telescopic: Which Is Best for Frequent Travelers?
- The Hand Strap Mistake That Causes Wrist Pain After 5km
- How to Train for a Multi-Day Trek Using Nordic Walking?
- Why “Motion is Lotion” Works to Lubricate Stiff Joints?
- Why Breathing Forest Air Lowers Stress Hormones for 7 Days?
- How to Practice Shinrin-Yoku to Boost Natural Killer Cells
Why Dragging Your Poles Ruins the Upper Body Workout Benefit?
The primary advantage of Nordic walking is its ability to transform a lower-body exercise into a full-body one. This transformation, however, is entirely dependent on one action: active propulsion. When you see someone dragging their poles, with the tips scraping the ground behind them, they are effectively nullifying the benefit. The poles become dead weight, not tools for engagement. The magic happens when you plant the pole and actively push your body past it. This push engages the lats, triceps, shoulders, and core muscles, which is precisely what drives the increased energy expenditure.
The numbers back this up unequivocally. When proper technique is employed, the upper body engagement is significant enough to make a real metabolic difference. In fact, Mayo Clinic research confirms a 20% increase in calories burned over a mile compared to regular walking. This bonus isn’t a freebie; it’s the direct result of turning your arms into powerful levers that propel you forward. Dragging the poles is the equivalent of trying to row a boat by letting the oars trail in the water. To unlock the workout, you must learn to “push the planet away” with every step.
Mastering this isn’t about brute force, but about refined technique. The key is to keep your arms relatively straight, swinging from the shoulder, and planting the pole tip by your mid-foot or heel. From there, you push backward until your arm is fully extended behind you. It’s this powerful, finishing push that activates the large muscles of your back and arms, turning your stroll into a dynamic, calorie-burning engine.
How to Adjust Pole Techniques When Moving from Asphalt to Trails?
A common mistake for new Nordic walkers is assuming the same technique works everywhere. The smooth, predictable surface of asphalt demands a different approach than the uneven, varied terrain of a forest trail. Mastering these adjustments is key not only for efficiency but also for stability and safety. Canadian Nordic walking instructors emphasize that walkers who learn terrain-specific adjustments maintain far better balance and confidence on natural paths.
On asphalt or pavement, the goal is maximum propulsion. You use the rubber tips (or “paws”) for grip and noise reduction. Here, you want a sharper, more diagonal pole angle to maximize the forward push. Think of it as “skiing on dry land.” In contrast, on trails, your primary goal shifts slightly from pure propulsion to a blend of propulsion and stability. The first step is to remove the rubber tips to expose the metal carbide spikes, which bite into dirt, roots, and rock for secure grip. The pole plant becomes more vertical, used not just to push off but also to test the stability of the ground ahead before you commit your weight. For steep uphill sections, it’s recommended to shorten telescopic poles by about 5cm to maintain a proper arm angle and avoid shoulder strain.
This image clearly illustrates the difference in pole contact and angle between a paved surface and a natural trail.
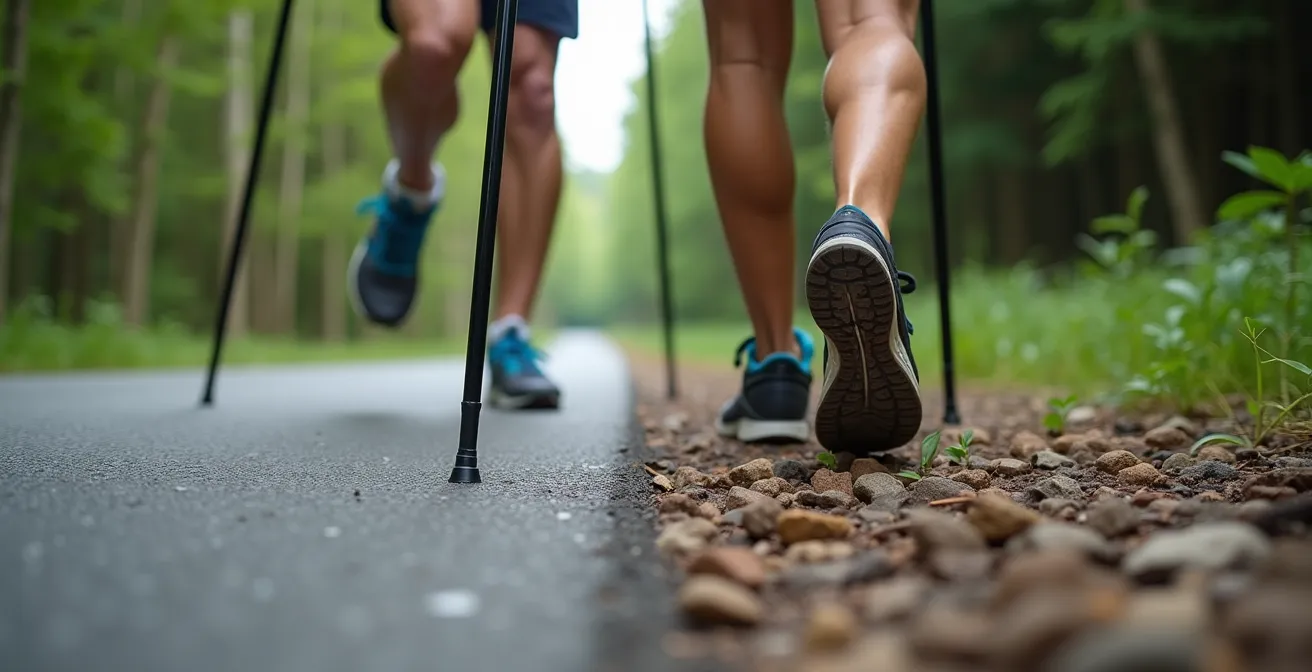
As you can see, the technique is not one-size-fits-all. The walker on asphalt uses the pole for a long, powerful push, while the walker on the trail uses a more upright plant for support and traction. Learning to make these subtle shifts consciously will make you a more versatile and capable Nordic walker, ready to tackle any environment with confidence.
Carbon Fixed or Aluminum Telescopic: Which Is Best for Frequent Travelers?
Choosing the right poles is as crucial as learning the right technique, especially if you plan to travel with them. The two main options are fixed-length carbon poles and adjustable aluminum telescopic poles, and the best choice depends entirely on your priorities. For the frequent traveler, the decision often comes down to a trade-off between ultimate performance and practical convenience.
Carbon fixed-length poles are the top choice for performance and comfort. They are incredibly lightweight and offer superior shock absorption, which is critical for protecting your joints. In fact, research shows that quality poles reduce up to 26% of the impact on hip, knee, and foot joints. However, their single-piece construction makes them cumbersome for air travel. Aluminum telescopic poles are the traveler’s best friend. They collapse down to a packable size (often around 60cm), fitting easily into a suitcase. While slightly heavier and offering less vibration dampening than carbon, they are more versatile, allowing you to adjust the length for different users or for steep uphill and downhill sections.
This table breaks down the key differences to help you make an informed decision based on your specific needs as a walker and traveler.
| Feature | Carbon Fixed | Aluminum Telescopic |
|---|---|---|
| Weight | Ultra-light (200-300g) | Moderate (350-450g) |
| Shock Absorption | Excellent – protects joints | Good with anti-shock system |
| Travel Convenience | Poor – full length | Excellent – collapses to 60cm |
| Price Range | $120-$180 | $80-$120 |
| Durability | High – no moving parts | Moderate – locking mechanism wear |
| Best For | Performance & joint protection | Frequent travelers & beginners |
Ultimately, if your primary goal is to have poles on hand for trips and you value convenience above all, aluminum telescopic poles are the clear winner. If your travels are specifically for walking events or you prioritize joint health and the lightest possible gear, finding a way to transport fixed-length carbon poles might be worth the effort.
The Hand Strap Mistake That Causes Wrist Pain After 5km
Persistent wrist or forearm pain after a walk is a red flag. It’s almost always caused by a fundamental misunderstanding of the hand strap’s purpose. Many beginners grip their poles tightly for the entire walk, a habit often called the “death grip.” This treats the strap as a simple safety leash. In reality, the strap is a sophisticated power transfer interface. Its job is to allow you to push off the pole without having to maintain a tight grip, which is inefficient and leads to strain.
The proper technique is a rhythmic “grip and release” motion. As your arm swings forward to plant the pole, you lightly close your hand around the grip. As you push the pole backward past your body, you should open your hand completely, letting the strap take the full pressure of the push against the heel of your palm. The American Nordic Walking Association highlights the core issue in their guide:
Keeping your hands closed at all times does not allow proper blood circulation
– American Nordic Walking Association, Nordic Walking Technique Guide
This lack of circulation and constant muscle tension is what leads to tendonitis and fatigue. Instructional programs from organizations like Nordic Fitness Canada demonstrate that with a correctly adjusted strap, the open-close motion becomes automatic. You push off with an open palm, and as the pole swings forward, it naturally falls back into your grasp.
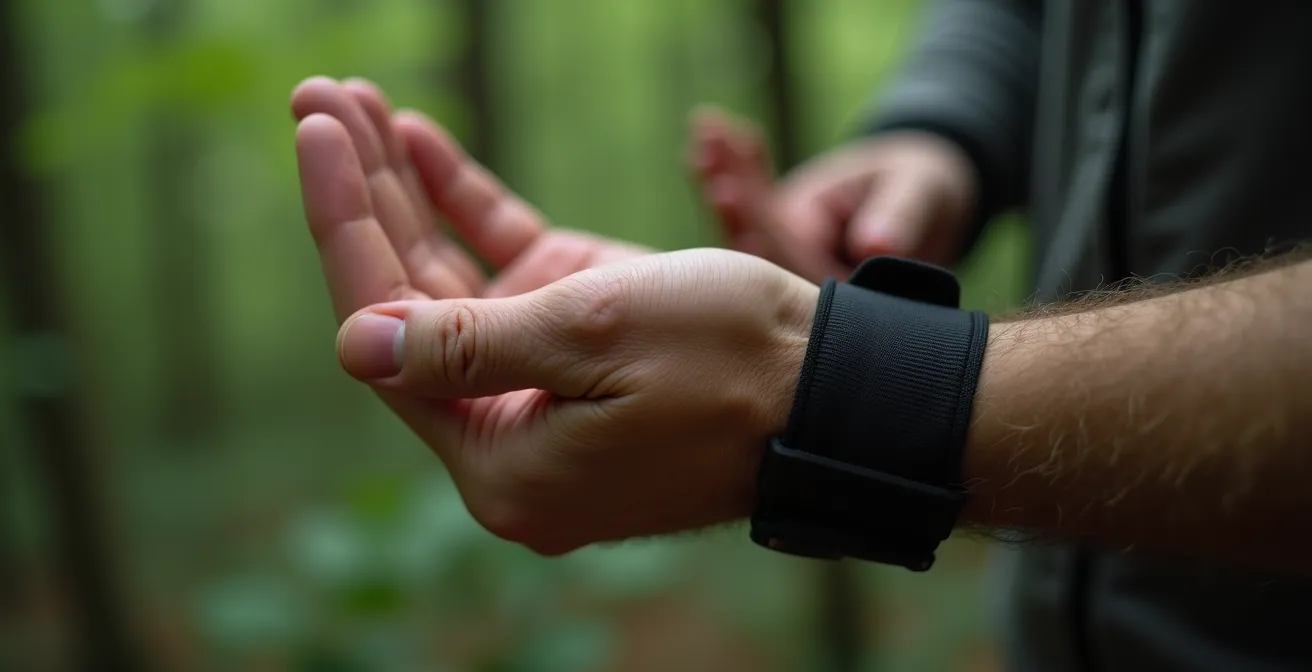
This macro shot shows the ideal transition. The force is transferred through the strap and the heel of the hand, not the clenching fingers. Mastering this release is not just about avoiding pain; it’s the key to a more powerful, efficient, and relaxing stride. It allows blood to flow freely and lets you walk for longer distances with greater comfort.
How to Train for a Multi-Day Trek Using Nordic Walking?
Nordic walking is an outstanding tool for preparing for a multi-day trek. Its genius lies in its ability to simultaneously build cardiovascular endurance and muscular strength across the entire body. While regular walking primarily conditions the legs, Nordic walking recruits the muscles of the core, back, chest, and arms. In fact, Canadian research confirms Nordic walking activates 90% of your body’s muscles, compared to just 50% in regular walking. This comprehensive conditioning is exactly what you need to handle long days on the trail with a backpack.
A structured training plan is the most effective way to prepare. Using a periodization model, you can progressively increase the demands on your body, ensuring you arrive at your trek strong and injury-free. The focus should shift from building a solid base to increasing intensity and finally, tapering before the event. This allows your body to adapt, build strength, and fully recover.
A well-rounded plan will incorporate not just distance, but also intensity and specificity. Adding hills simulates the demands of a real trek, while back-to-back sessions train your body to perform even when fatigued. The final weeks should include a “dress rehearsal” with the weighted pack you plan to carry. Here is a sample 8-week periodization plan you can adapt:
- Weeks 1-3 (Base Building): Start with 3 weekly sessions of 30-45 minutes focusing on technique mastery. The goal is to make the correct form second nature. Gradually increase the duration of one of these walks to 60 minutes by the end of week 3.
- Weeks 4-6 (Intensity Phase): Introduce challenging elements. Add a session focused on hills or incorporate Nordic walking intervals (e.g., 5 minutes fast, 3 minutes recovery, repeated 4 times). Start doing back-to-back weekend sessions: a long, steady walk on Saturday followed by a shorter, faster walk on Sunday.
- Weeks 7-8 (Taper & Specificity Phase): In the final two weeks, reduce your total walking volume by about 30% to allow your body to recover and build energy stores. Maintain some intensity but keep sessions shorter. During one of your last long walks, carry a backpack with the weight you expect to have on your trek.
Why “Motion is Lotion” Works to Lubricate Stiff Joints?
For anyone with stiff or achy joints, the phrase “motion is lotion” is more than a catchy saying; it’s a physiological reality. Our joints are lubricated by synovial fluid, a viscous liquid that nourishes cartilage and allows bones to glide smoothly. Unlike our circulatory system, the synovial system has no pump. The fluid is moved in and out of the cartilage through the mechanical action of loading and unloading the joint—a process perfectly facilitated by the rhythmic nature of Nordic walking.
Every time you plant a pole and push off, you engage in a gentle compression and decompression cycle. This action effectively pumps the synovial fluid through the joint cartilage, delivering oxygen and nutrients while flushing out waste products. Research highlighted by Rest Less UK on office workers with chronic back pain showed that a 12-week Nordic walking program significantly reduced their discomfort. The study concluded this was due to both the synovial pumping action and the engagement of core and back muscles essential for proper spinal alignment.
Furthermore, Nordic walking provides this beneficial motion while simultaneously reducing harmful impact. The poles act as a support system, offloading a significant amount of stress from the lower body. This is especially crucial when walking downhill, a movement that can be particularly jarring on the knees. Careful biomechanical studies demonstrate that poles can offload 25-30% of the impact from the knees and hips during descents. This unique combination of promoting healthy motion while minimizing stressful impact makes it an ideal activity for maintaining or improving joint health, especially for those with concerns about arthritis or previous injuries.
Why Breathing Forest Air Lowers Stress Hormones for 7 Days?
Combining Nordic walking with a natural environment—a practice often related to the Japanese concept of Shinrin-yoku or “forest bathing”—amplifies the benefits far beyond physical fitness. The positive effects on mental well-being are profound and scientifically measurable. One of the most remarkable findings is the lasting impact on stress. The simple act of spending time in a forest environment can dramatically lower levels of cortisol, the body’s primary stress hormone.
The effect is not fleeting. Groundbreaking Japanese forest medicine research shows a significant reduction in cortisol that can be maintained for up to seven days after a forest visit. This suggests that a weekly Nordic walk in the woods can have a sustained, cumulative effect on lowering your baseline stress levels. But what is it about forest air that is so powerful?
The answer lies in a cocktail of invisible organic compounds called phytoncides. These are antimicrobial substances released by trees to protect themselves from pests and disease. When we inhale this forest air, we breathe in these beneficial compounds. As the New York State Department of Environmental Conservation explains:
Phytoncides have antibacterial and antifungal qualities which help plants fight disease. When people breathe in these chemicals, it triggers our immune system
– New York State Department of Environmental Conservation, Forest Health Benefits Study
This immune response, coupled with the calming sensory experience of being in nature, works to down-regulate the body’s stress response. The rhythmic movement of Nordic walking further enhances this by promoting deep, steady breathing, increasing your inhalation of this therapeutic forest air. It’s a powerful synergy of movement, nature, and biochemistry.
Key Takeaways
- The 20% calorie-burn benefit of Nordic walking is unlocked only through active pole propulsion, not passive dragging.
- Tailor your technique and pole tips (rubber for pavement, metal for trails) to the terrain for optimal stability and efficiency.
- Combining rhythmic walking with mindful immersion in a forest (Shinrin-yoku) can lower stress and boost immunity for days.
How to Practice Shinrin-Yoku to Boost Natural Killer Cells
Beyond stress reduction, the practice of Shinrin-yoku, or forest bathing, during your Nordic walks offers a remarkable boost to your immune system. Specifically, it has been shown to increase the activity of one of the body’s most important defense mechanisms: Natural Killer (NK) cells. These are a type of white blood cell that plays a critical role in fighting off virally infected cells and detecting and destroying early-stage cancer cells.
The evidence for this effect is compelling. A landmark Japanese immunology study documented a nearly 50% increase in NK cell activity in participants after a three-day trip to a forest. A follow-up controlled study found an 80% boost in NK activity after a forest trip compared to only 10% for a similar trip in a city. Most impressively, the study showed that even a single day trip to a forest park maintained elevated NK cell levels for a full week afterward. This suggests that a weekly “Nordic-Yoku” session could be a sustainable strategy for enhancing your anticancer immunity year-round.
To get these benefits, you don’t just walk through the forest; you immerse yourself in it. It’s about consciously engaging your senses. The key is to slow down and integrate mindful pauses into your rhythmic walk. This allows you to maximize your exposure to the beneficial phytoncides and engage the parasympathetic (rest and digest) nervous system. By creating a hybrid practice, you get the full-body workout of Nordic walking and the profound physiological benefits of forest medicine.
Your Nordic-Yoku Integration Checklist
- Warm-Up Sync: Begin with 15 minutes of rhythmic Nordic walking. Focus on synchronizing your deep breaths with your steps to warm up the body and prepare the mind.
- Sensory Pause: Find a calm spot and stand still for 10 minutes. Practice a ‘soft gaze’ by defocusing your vision and taking in the whole scene at once to relax the optic nerve.
- Mindful Movement: Resume walking for 20 minutes at a moderate pace. Shift your focus entirely to your breathing, inhaling deeply through the nose to maximize phytoncide intake.
- Texture Mapping: In the final 5 minutes, slow down and use your pole tips to mindfully explore the textures of the forest floor—moss, soil, roots, leaves—connecting you to the physical environment.
- Gratitude Close: End your walk by standing still for a minute. Acknowledge the experience and the environment before heading back, solidifying the mental benefits of the session.
By integrating proper technique, choosing the right gear, and embracing the healing power of nature, you elevate Nordic walking from a simple exercise to a holistic practice for mind and body. The key is consistency and mindfulness in every step. To truly transform your health, start by applying these principles to your very next walk.