Contrary to popular belief, the pool isn’t just for gentle floating; it’s a sophisticated resistance machine that can be precisely controlled to rebuild dense muscle after knee surgery, often more effectively than land-based weights.
- Water’s “hydrodynamic drag” creates variable resistance that increases with speed, allowing for progressive overload without any joint impact.
- Manipulating variables like water depth, temperature, and specialized equipment allows you to target specific goals, from cardio fitness to fat loss.
Recommendation: Shift your mindset from simply ‘exercising in water’ to actively ‘using water as your training equipment’ by focusing on movement speed and surface area to control intensity.
The journey back from knee surgery presents a frustrating paradox: you need to load your muscles to rebuild their strength and density, yet loading your new or repaired joint too soon can lead to setbacks, pain, and inflammation. Traditional gym equipment, with its fixed weights and impact, often feels like a distant goal. Many are advised to turn to the pool, but often with vague instructions to simply “walk” or “move around.” This advice, while well-intentioned, misses the true power of water.
The key to an accelerated and safe recovery lies not just in water’s famous buoyancy, but in a deeper physical principle: hydrodynamic drag. This is the force that resists your movement, and unlike a dumbbell, its intensity isn’t fixed. It changes based on how fast you move and the shape of the object moving through it—in this case, your own body. Before starting any aquatic program, it’s crucial to have your surgeon’s clearance, ensuring your incision is fully healed and ready for immersion.
This guide reframes aquatic therapy from a passive, supportive activity into an active, strategic training system. We will move beyond simply listing exercises and instead explore how to manipulate the physical properties of water to create a personalized, zero-impact rehabilitation program. You will learn to use water as a precise tool to not only protect your knee but to actively build the muscle density essential for long-term stability and function.
This article details a complete hydrotherapy framework for post-operative knee recovery. We will explore the science of water resistance, specific techniques for cardiovascular and strength training, and the critical environmental factors that can make or break your rehabilitation progress.
Summary: Your Guide to Aquatic Knee Rehabilitation
- Why Water Drag Provides Safer Resistance Than Weighted Machines?
- How to Run Without Touching the Bottom to Maintain Cardio Fitness?
- Buoyancy Weights or Drag Gloves: Which Builds Upper Body Strength?
- The Pool Temperature Error That Worsens Arthritis Pain
- How to Do Interval Training in the Shallow End for Fat Loss?
- Why Lymphatic Massage Must Be lighter Than a Nickel’s Weight?
- When to Avoid HIIT Workouts to Prevent Adrenal Burnout
- How to Modify Your Squat to Protect Knees While Building Leg Strength
Why Water Drag Provides Safer Resistance Than Weighted Machines?
The fundamental advantage of water over traditional weights lies in how it applies force to the body. On land, a 10-pound dumbbell weighs 10 pounds at every point of the exercise. Gravity is constant and unforgiving, placing consistent stress on your joints. Water operates on two entirely different principles: buoyancy and hydrodynamic drag. Buoyancy is the “anti-gravity” effect you feel, offloading your body weight and reducing joint compression. Comprehensive research demonstrates that water’s buoyancy reduces your effective body weight to just 50% at hip-depth, 30% at mid-chest, and a mere 10% when you’re neck-deep. This dramatically reduces the stress on a healing knee.
However, the real magic for muscle building is hydrodynamic drag. Think of it as a form of viscous resistance. Unlike the fixed resistance of a weight, drag is variable and accommodating. It provides resistance in proportion to the effort you exert. If you move your leg slowly through the water, the resistance is minimal, perfect for early-stage range of motion exercises. As you heal and can push harder and faster, the water automatically “pushes back” with more force. This creates a self-regulating environment where you can’t easily overload the joint. If pain occurs, you instinctively slow down, and the resistance immediately decreases.
This is fundamentally safer than a leg extension machine, where the weight is constant. If you fail mid-repetition on a machine, the weight can dangerously load the joint. In water, if you experience fatigue or pain, the resistance simply disappears as your movement stops. This allows you to work your muscles to their functional limit—the point where form breaks down—without the risk of impact or sudden, uncontrolled joint loading.
How to Run Without Touching the Bottom to Maintain Cardio Fitness?
For many athletes and active individuals, one of the biggest frustrations after knee surgery is the loss of cardiovascular fitness. The high-impact nature of running is off-limits for months, leading to a decline in endurance. Deep-water running offers a perfect solution: it mimics the biomechanics of running and provides a robust cardiovascular workout with zero impact on the knee joint. By using a flotation belt, you can remain suspended vertically in the deep end of the pool, allowing your legs to move freely without ever touching the bottom.
The technique involves maintaining an upright posture with a slight forward lean, keeping your core engaged to prevent rocking. You then “run” in place, driving your knees up and pushing your feet down and back against the water’s resistance. The effort required to move your limbs through the dense medium of water elevates your heart rate significantly, providing an effective cardio session. This method is so effective that it’s used by elite athletes for cross-training and injury rehabilitation.
This paragraph introduces a complex concept. To well understand it, it is useful to visualize its main components. The illustration below breaks down this process.
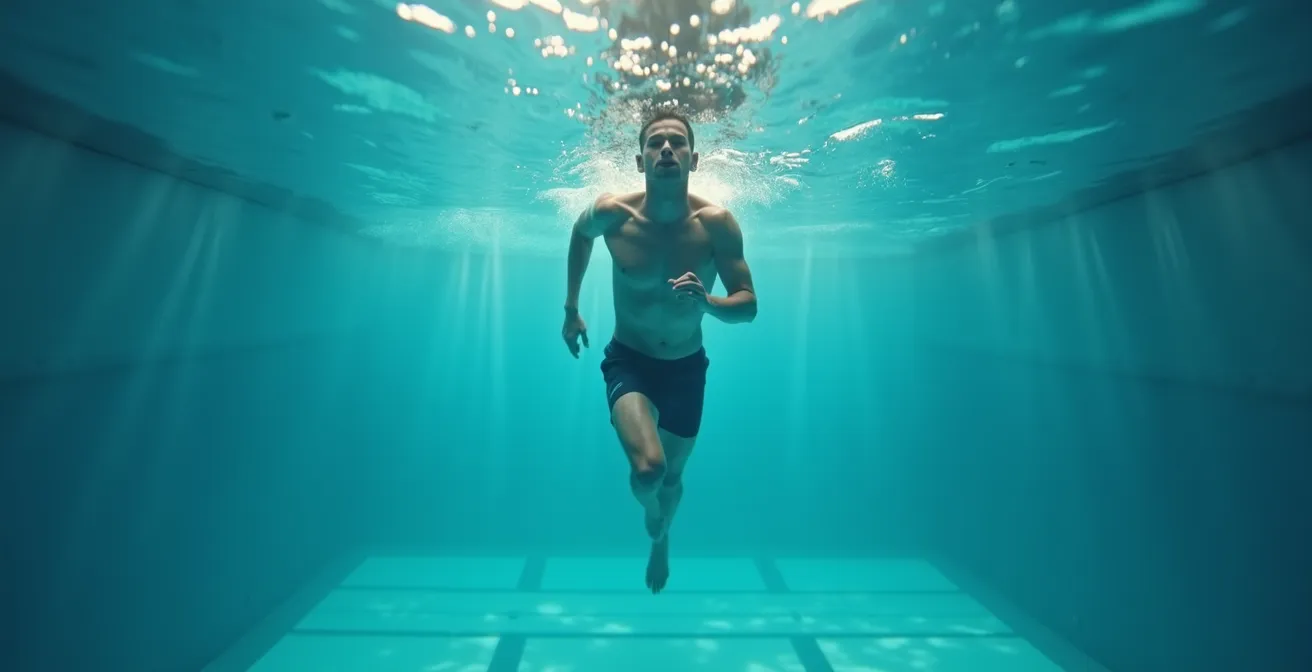
As the image demonstrates, proper form is crucial for maximizing the benefit and protecting your back. The case of Meghan, a young athlete who tore her ACL, MCL, PCL, and meniscus, is a powerful testament to this technique. Through a protocol centered on aquatic therapy, including deep water running, she progressed from minimal range of motion to 100 degrees of knee flexion in just one week and was able to walk without crutches, all while maintaining her fitness. For a structured approach, you can follow a simple progression:
- Beginner: Use a flotation belt for maximum support. Focus on form with a “Rehab Ratio” of 1 minute of running followed by 2-3 minutes of gentle recovery treading.
- Intermediate: Progress to using pool noodles under your arms for moderate support, which requires more core engagement.
- Advanced: Attempt short intervals (e.g., 30 seconds) with no flotation device at all to maximally engage your core and stabilizer muscles.
Buoyancy Weights or Drag Gloves: Which Builds Upper Body Strength?
While knee surgery recovery focuses on the lower body, maintaining upper body and core strength is vital for overall stability, balance, and the ability to use walking aids like crutches. The aquatic environment offers unique tools for this, primarily falling into two categories: buoyancy equipment (like foam dumbbells) and drag equipment (like webbed gloves or paddles). They work in opposite ways but are complementary for building functional strength.
Buoyancy weights, such as foam dumbbells, want to float. Their resistance is generated when you push them *down* into the water, working against their natural tendency to rise. This is excellent for developing “pushing” strength, activating muscles like the triceps and deltoids. This motion directly mimics functional movements like pushing up from a chair or bed, which is often challenging post-surgery. The challenge is in the concentric (pushing) phase of the movement.
Conversely, drag equipment like webbed gloves or paddles increases the surface area of your hands. They create minimal resistance when slicing through the water but significant drag when you pull them with an open palm. This is ideal for developing “pulling” strength, engaging the biceps, lats, and back muscles. This pulling and rotational strength is crucial for stabilizing your torso while you walk, preventing you from compensating and developing an uneven gait. Here, the challenge is in the eccentric and concentric phases of pulling and sweeping motions. The following table breaks down their uses.
This comparative analysis clarifies which tool is best for specific rehabilitation goals.
| Equipment Type | Primary Function | Best For | Resistance Type |
|---|---|---|---|
| Buoyancy Weights (Foam Dumbbells) | Pushing strength development | Mimicking chair/bed push-offs | Resistance when pushed underwater |
| Drag Gloves/Paddles | Pulling & rotational strength | Torso stabilization during walking | Increased surface area resistance |
| Combination Use | Full upper body integration | Core stability with movement | Multi-directional resistance |
The Pool Temperature Error That Worsens Arthritis Pain
Not all pools are created equal, and for someone recovering from knee surgery—especially with underlying conditions like arthritis—the water temperature is a critically important variable. A common mistake is exercising in a pool that is too cold. While cooler water (around 82-86°F) is suitable for intense, athletic swimming, it can be counterproductive for rehabilitation. Cold water causes muscles and soft tissues to tense up, potentially increasing stiffness and pain around the joint.
For therapeutic purposes, warmer water is essential. The heat helps to increase blood flow, relax muscles, and decrease pain perception. This makes it easier to work on regaining your knee’s range of motion. According to therapeutic guidelines, research shows the ideal therapeutic temperature range is between 90-94°F (32-34°C). In this temperature range, the water is warm enough to provide comfort and promote tissue extensibility, but not so hot that it causes overheating during a workout or exacerbates inflammation.
Exercising in water that is too warm (above 95°F) can also be a problem, as it can increase swelling (edema) in the acute post-operative phase. Therefore, matching the water temperature to your stage of recovery is key. Here are some general guidelines:
- Early Post-Surgery (Weeks 1-4): Target a range of 88-92°F. This is warm enough for comfort but cool enough to help manage acute inflammation.
- Mid-Recovery (Weeks 4-12): The optimal 90-94°F range is perfect for this phase, focusing on pain relief and improving muscle flexibility.
- Late-Stage Rehab (3+ months): If your focus shifts to higher-intensity cardio, a slightly cooler pool (82-86°F) may be appropriate to prevent overheating.
Always check with the aquatic facility about their pool temperature before starting a program, as this single factor can significantly impact your comfort and progress.
How to Do Interval Training in the Shallow End for Fat Loss?
Weight management is often a concern during the sedentary period following knee surgery. The inability to perform traditional cardio can lead to unwanted fat gain, which in turn places more stress on the healing knee. Shallow-water interval training, also known as High-Intensity Low-Impact Training (HILIT), is an excellent strategy to burn calories and improve metabolic health without any of the jarring impact of land-based exercises.
The principle is the same as traditional HIIT: alternate short bursts of high-intensity effort with periods of active recovery. In the shallow end (waist- to chest-deep water), you can achieve a high heart rate simply by trying to move quickly against the water’s powerful drag. For example, walking or jogging forward as fast as possible for 45 seconds, then turning around and walking backward slowly for 90 seconds to recover. The water acts as a brake, creating immense resistance during the high-effort intervals and providing gentle support during recovery.
This method has shown real-world results. One case study involving users of a swim spa noted a patient who lost 15 pounds in 6 weeks by doing aqua Zumba, a form of HILIT, four times per week. The key is that progression doesn’t come from higher impact, but from other variables. You can increase the intensity by: increasing your speed, increasing the water depth (which adds more resistance), or decreasing your rest periods. This makes HILIT an infinitely scalable and joint-safe method for fat loss throughout the recovery process.
Why Lymphatic Massage Must Be lighter Than a Nickel’s Weight?
The title of this section references a principle from manual lymphatic drainage massage, where therapists use incredibly light pressure because the lymphatic system lies just beneath the skin. Interestingly, you can achieve a similar—and constant—effect simply by being immersed in water. This is due to another physical principle: hydrostatic pressure. This is the pressure exerted by a fluid at rest, and it’s one of the unsung heroes of aquatic therapy, especially for managing the persistent swelling (edema) that plagues post-operative knees.
Hydrostatic pressure is exerted on all submerged surfaces of the body, creating a gentle, consistent “squeeze.” This pressure is greatest at the deepest point, meaning your feet and ankles receive more pressure than your knees, and your knees more than your hips. This natural pressure gradient helps push stagnant fluid from the extremities back towards the center of the body to be processed and eliminated. It’s essentially a full-body compression sock that works continuously to reduce swelling without any manual manipulation.
The clinical evidence for this effect is strong. Studies show hydrostatic pressure reduces edema by an average of 3.6 cm in knee circumference after aquatic sessions. Another pilot study on post-operative patients found that the constant, gentle compression from the water was equivalent to lymphatic drainage massage, helping move fluid away from the surgical site and leading to significant improvements in pain and function scores (WOMAC). This automatic, passive benefit is one of the most powerful reasons to begin an aquatic therapy program as soon as your surgeon gives approval.
Key Takeaways
- Water’s buoyancy reduces joint load by up to 90%, while its drag provides safe, variable resistance that increases with your effort.
- Deep-water running allows for high-intensity cardio with zero impact, preserving fitness while your knee heals.
- The pool’s temperature is a critical therapeutic tool; 90-94°F is ideal for pain relief and muscle relaxation, while colder pools can increase stiffness.
When to Avoid HIIT Workouts to Prevent Adrenal Burnout
While the benefits of aquatic training are clear, more is not always better, especially in the early stages of recovery. Pushing too hard, too soon—even with low-impact exercises—can lead to a state of systemic exhaustion often called adrenal burnout. It’s crucial to understand that surgery itself is a major physical stressor. Your body is already working overtime to heal tissues and manage inflammation. Adding overly intense exercise on top of this can create a “stress debt” that overwhelms your system.
As a hydrotherapy specialist, I often see patients who, driven to recover quickly, try to jump into high-intensity workouts before their body is ready. This is a mistake. As one expert aptly puts it:
Surgery is a massive physical stressor that already taxes the adrenal system. Piling on intense exercise too early creates a ‘stress debt’ that slows down tissue repair and overall healing.
– Dr. Thoralf R. Liebs, Department of Orthopaedic Surgery, University of Schleswig-Holstein Medical Center
Instead of feeling energized by your workouts, you may start to feel persistently drained. Progress can stall or even regress. It’s vital to listen for your body’s true signals of overtraining, which go beyond simple muscle soreness. You should scale back your intensity if you experience:
- Persistent exhaustion rather than feeling energized after workouts.
- Decreased sleep quality despite feeling tired.
- Increased irritability, anxiety, or mood swings.
- A plateau or decline in your recovery progress (e.g., strength or range of motion).
A safe rule of thumb is to master 3-4 weeks of consistent, moderate-intensity aquatic exercise before even considering introducing short HIIT or HILIT intervals. Your primary goal is healing, and sustainable, consistent effort will always outperform premature, excessive intensity.
How to Modify Your Squat to Protect Knees While Building Leg Strength
The squat is the king of lower-body exercises, essential for rebuilding the quadriceps, hamstrings, and glutes that support the knee. However, performing a squat on land can be painful and risky after surgery. The water provides the perfect environment to re-learn this fundamental movement pattern safely. By manipulating water depth, you can progressively reintroduce your body weight to the squatting motion.
Starting in chest-deep water is ideal. Here, biomechanical studies confirm that exercising in chest-deep water provides an 80% reduction in body weight. This massive offloading allows you to focus on form and achieve a greater, pain-free range of motion than you could on land. You can use the pool wall for back support initially to ensure perfect alignment and prevent your body from leaning too far forward, which would put stress on the knee.
As your strength and confidence grow, you can progress to shallower water. Moving to waist-deep water increases the load to about 50% of your body weight. This is a significant step up and a great way to build strength. The final stage before returning to land-based squats is performing them in thigh-deep water, which provides minimal support but still offers the safety net of water’s resistance to prevent sudden, uncontrolled movements. This progressive approach ensures you are building strength on a solid foundation of pain-free movement.
Your Action Plan: The Progressive Water Squat Protocol
- Phase 1 (Maximum Support): Begin in chest-deep water, using the pool wall for back support. Focus on slow, controlled descents to a pain-free depth. Aim for 3 sets of 10 repetitions.
- Phase 2 (Increased Load): Once comfortable, move away from the wall and perform free-standing squats in chest-deep water. Then, progress to waist-deep water to increase the load to 50% body weight.
- Phase 3 (Building Strength): In waist-deep water, focus on increasing repetitions. Your goal is to achieve 3 sets of 15 pain-free squats, which is a key milestone.
- Phase 4 (Pre-Land Conditioning): Move to thigh-deep water. This is the final test phase, closely simulating the load of a land-based squat while still providing a safe environment.
- Phase 5 (Land-Ready Test): Before attempting squats on land, ensure you can complete 3 sets of 15 perfect-form, pain-free squats in waist-deep water. This indicates sufficient strength and control for the transition.
By mastering the squat in the water first, you are not only rebuilding muscle but also retraining your neuromuscular system for optimal movement patterns, drastically reducing the risk of re-injury when you return to the gym or your favorite activities.
By adopting this strategic approach, you transform the pool from a simple recovery aid into your personal, zero-impact gym. Embrace the principles of hydrodynamic drag, hydrostatic pressure, and thermal control to guide your body back to full strength and function. For personalized guidance tailored to your specific condition, the next logical step is to consult with a qualified physical therapist or hydrotherapy specialist.