The greatest mistake in lighting a multi-use space is treating all light as equal; the key is not adding more lamps, but choreographing layers of light to guide the room’s psychological function.
- Lighting design is a form of psychological direction, using Kelvin temperatures and brightness to signal states of focus, relaxation, or intimacy.
- A successful scheme balances three non-negotiable layers—Ambient, Task, and Accent—and embraces shadow as a tool for creating depth and mood.
Recommendation: Stop thinking about individual fixtures and start programming distinct “scenes” for your daily activities, transitioning from cool, bright task light to a warm, low-level ambient glow to prepare for rest.
In an open-plan home, the space where you prepare lunch, answer emails, and unwind with a book is often one and the same. Yet, as evening falls, does that vibrant, functional kitchen-office-lounge combo retain its charm, or does it collapse into a flat, sterile environment that feels more like a brightly-lit cafeteria than a sanctuary? The common advice is to install dimmers or invest in a few smart bulbs. While these are components, they are not the solution. They are instruments in an orchestra, but without a conductor or a score, they create noise, not music.
The true art of lighting a multi-use room lies not in illumination, but in its deliberate absence. It’s about a form of psychological choreography, where light and shadow are used to dictate mood, define invisible zones, and guide your body’s natural rhythms. The prevailing belief is that good lighting means eliminating shadows, but a designer knows that intentional shadow is what creates intimacy, depth, and visual rest. It’s the difference between a functional workspace and a restorative home.
This guide moves beyond the generic to the specific. We will dissect the science and strategy behind professional lighting design. We will explore how to layer light not just by height, but by purpose and temperature, transforming a single room into a sequence of distinct, atmospheric experiences. You will learn to control not just brightness, but the very feeling of your space, conducting a daily symphony of light that shifts from the crisp energy of morning to the tranquil glow of evening.
This article provides a structured approach to mastering your home’s atmosphere. Follow along as we deconstruct the core principles of lighting design, from the foundational layers to advanced techniques for creating mood and supporting your well-being.
Summary: A Designer’s Blueprint for Atmospheric Lighting
- Why You Need Task, Accent, and Ambient Light in Every Room?
- How to Mix Kelvin Temperatures Without Creating a Visual Clash?
- Hardwired Dimmers or Smart Apps: Which Is Better for Daily Ease?
- The Mistake of Overusing Recessed Pot Lights That Creates Shadows
- When to Shift from Task Lighting to Ambient Glow for Sleep Prep?
- Why Your Bathroom Light Is Waking You Up More Than Espresso?
- How to Test Pastels so They Don’t Look “Muddy” in North-Facing Rooms?
- How to Create a “Hygge” Corner to Combat Seasonal Affective Disorder
Why You Need Task, Accent, and Ambient Light in Every Room?
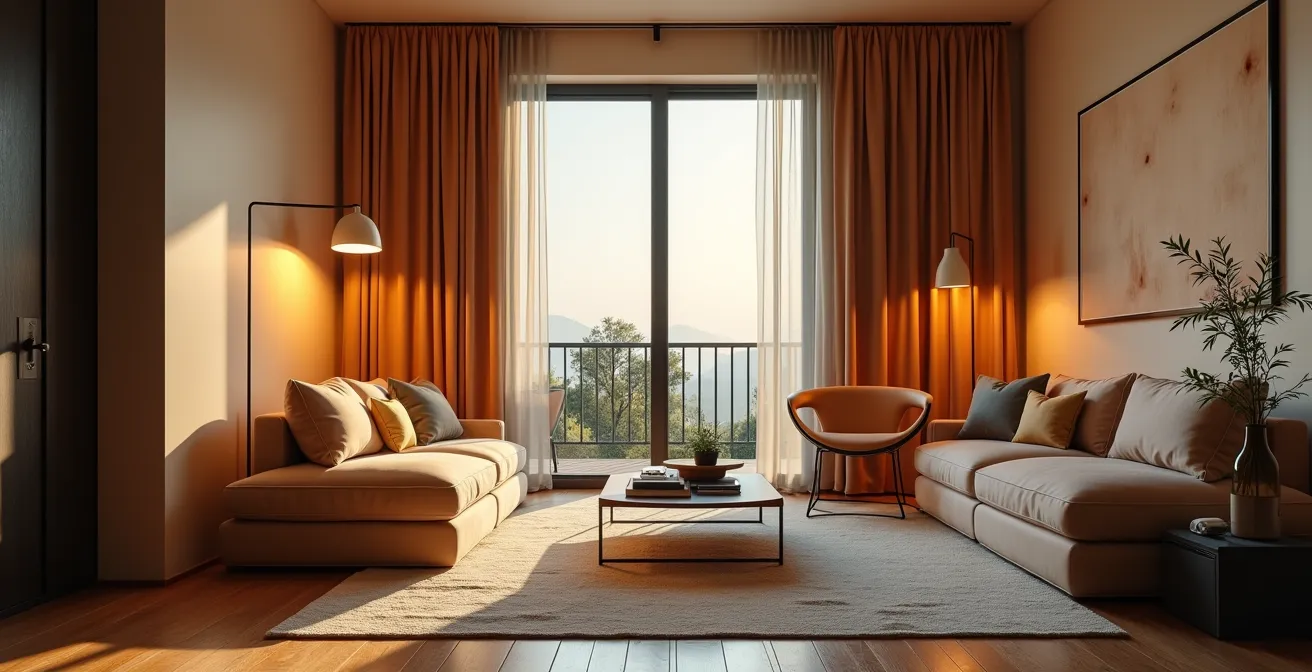
A single, dominant light source, even if dimmable, creates a monotonous and psychologically flat environment. To build atmosphere, you must think in three distinct, non-negotiable layers. This isn’t about having more lamps; it’s about assigning a specific psychological role to each type of light. Your ambient light is the foundation—a general, diffuse glow from ceiling fixtures or recessed lights that provides a baseline of illumination. Its purpose is to create a feeling of safety and reduce the primal anxiety associated with darkness.
Next, task lighting acts as a ‘concentration beacon’. This is focused, often brighter light directed at specific zones where activities occur: a reading chair, a kitchen counter, a desk. By creating a higher-contrast area, you are subconsciously signaling to your brain that this is a zone for focus and activity. Finally, accent light provides the emotional punctuation. These are small, directed pools of warm light that highlight artwork, plants, or architectural textures. They draw the eye, create visual interest, and break up large, uninviting surfaces into intimate vignettes.
The magic happens when these layers are balanced. A recent redesign of a high-end restaurant demonstrates this principle perfectly. The project incorporated dynamic lighting that transitioned from bright task lighting during lunch service to progressively warmer accent lighting for dinner. The result was not just aesthetic; it led to a 35% increase in evening table turnover and significantly improved guest ratings, proving that layered lighting directly influences behaviour and satisfaction.
How to Mix Kelvin Temperatures Without Creating a Visual Clash?
Once you’ve established your three layers, the next step is to choreograph their color temperature, measured in Kelvin (K). Mixing temperatures is essential in a multi-use space, but when done incorrectly, it creates a jarring visual clash. The secret isn’t to make everything uniform, but to create deliberate, harmonious Kelvin Zones that align with the function of each space. Cool light (3500K-4000K) promotes alertness, making it ideal for task areas, while warm light (2200K-3000K) encourages relaxation and is best for ambient and accent layers.
The most common mistake is ignoring the vertical dimension. Just as sound travels, light ‘feels’ different at various heights. Warm, intimate light should live at or below eye level, while cooler, more functional light can live above. This vertical separation helps prevent the temperatures from clashing, creating a natural gradient from an active ceiling to a calm human-level plane.
Equally critical is the quality of the bulb itself, measured by the Color Rendering Index (CRI). A low-CRI bulb will make even the most beautiful colors look flat and distorted, exacerbating temperature clashes. Investing in high-quality bulbs is non-negotiable for a professional result, as research on lighting quality shows that using 95+ CRI bulbs can reduce the perception of visual clash by over 70%. This table provides a clear framework for assigning Kelvin temperatures to different zones and layers.
| Zone | Kelvin Range | Height Placement | Purpose | Percentage of Room |
|---|---|---|---|---|
| Task Areas | 3000K-4000K | Above eye level | Focus & concentration | 20% |
| Ambient Base | 2700K-3000K | Ceiling level | General illumination | 60-80% |
| Accent Points | 2200K-2700K | At/below eye level | Mood & atmosphere | 20% |
| Sleep Prep | <2200K | Floor level | Circadian wind-down | Optional evening |
Hardwired Dimmers or Smart Apps: Which Is Better for Daily Ease?
With your layers and temperatures planned, the question of control arises. The market is saturated with smart apps that promise infinite control, but for daily ease and atmospheric integrity, the answer is rarely digital-only. New York Interior Designer Jarret Yoshida highlights a crucial, often-overlooked point about the transition to a relaxed state:
The physical, haptic feedback of turning a dial can be more neurologically calming and less disruptive to a ‘wind-down’ state than the blue light and notifications of a smartphone interface.
– Jarret Yoshida, New York Interior Designer Mood Lighting Guide
Reaching for a phone, unlocking it, finding an app, and navigating a menu introduces cognitive friction and a burst of blue light right when you’re trying to signal to your brain that it’s time to relax. It breaks the very mood you’re trying to create. A physical dimmer, by contrast, is immediate, tactile, and intuitive. This doesn’t mean smart technology has no place. The most effective solution is a hybrid system that combines the best of both worlds.
This approach uses physical smart switches at room entrances for instant, guest-friendly control, while leveraging an app for the initial setup of pre-programmed “scenes.” You can create a ‘Work Focus’ scene (bright task lights, neutral ambient), an ‘Evening Relax’ scene (warm accent and ambient layers), and a ‘Night Mode’ (ultra-low, warm glow). These scenes can then be triggered by a physical switch, a voice command, or a single tap, giving you the power of complex choreography with the simplicity of a light switch. A physical remote on a coffee table or nightstand completes the system, ensuring control is always within reach without requiring a screen.
The Mistake of Overusing Recessed Pot Lights That Creates Shadows
One of the most pervasive and costly mistakes in residential lighting is the overuse of recessed “pot” lights arranged in a rigid grid. While they seem like a clean, modern solution for ambient light, they create a flat, sterile illumination that casts harsh, unflattering shadows on people’s faces. In fact, lighting design research indicates that a grid of pot lights can create up to 65% more facial shadows than a mixed-level lighting scheme. This “interrogation room” effect makes a space feel unwelcoming and formal, the exact opposite of a relaxing home environment.
The design-led alternative is to treat shadow as an intentional element. Instead of trying to eliminate it, you use it to create depth, contrast, and intimacy. This is the principle of chiaroscuro—the play of light and dark. You achieve this by moving light sources off the ceiling and onto the walls and floor. Wall-mounted sconces at face level provide a soft, flattering glow, while floor lamps can wash a wall with light or create a cozy reading nook. This creates pools of light and zones of comfortable shadow, making a room feel larger and more dynamic.
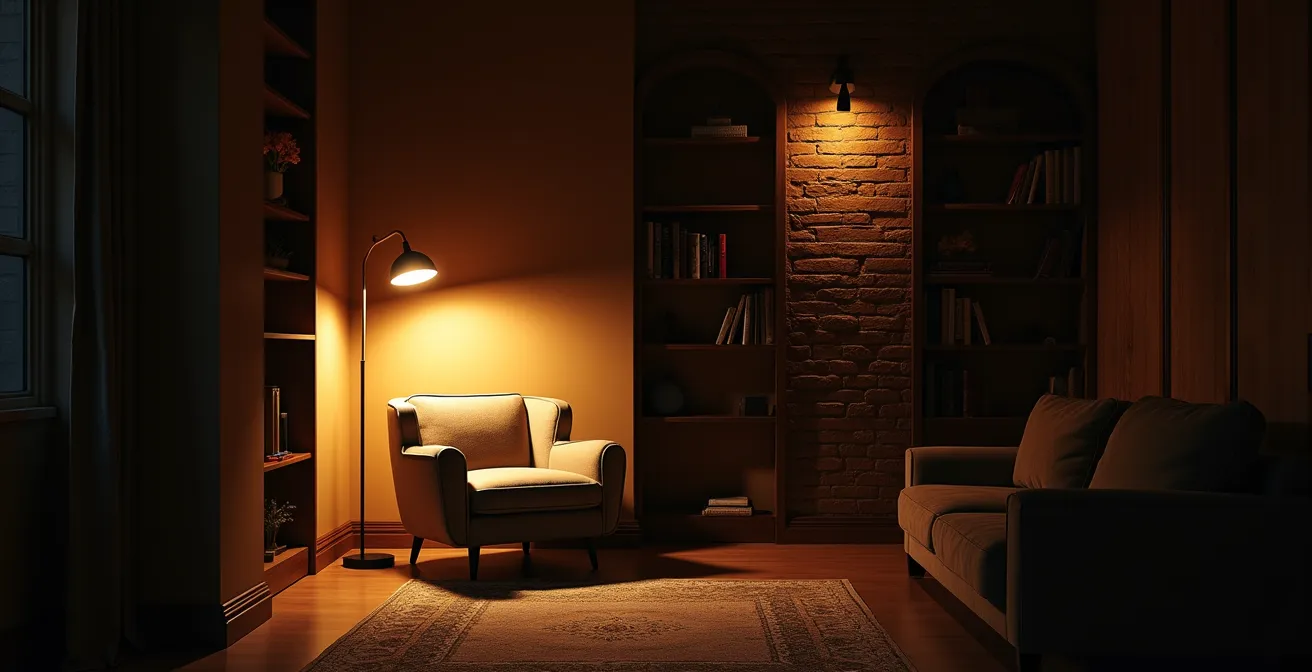
A residential project successfully solved this exact problem. An existing grid of 12 overhead pot lights was replaced with a combination of 6 perimeter downlights for wall washing, paired with strategically placed wall sconces at face level. The transformation eliminated unflattering under-eye shadows, created a vastly improved ambiance for evening entertaining, and resulted in a 40% reduction in energy consumption. This case study proves that better lighting often means fewer, more strategically placed fixtures.
When to Shift from Task Lighting to Ambient Glow for Sleep Prep?
The most critical lighting transition in a multi-use space is the one that prepares your body for sleep. This isn’t just about dimming the lights; it’s a biological imperative. Your body’s production of melatonin, the hormone that regulates sleep, is extremely sensitive to light. As sleep research demonstrates that even low light levels above 10-30 lux can suppress melatonin by up to 50%, a proper “wind-down” sequence is essential. This transition should begin approximately 90 minutes before your desired bedtime.
The goal is to orchestrate a Circadian Shutdown, mimicking the natural progression of a sunset. This involves gradually decreasing both the intensity (lux) and the color temperature (Kelvin) of your lighting. You start by eliminating all cool-toned task lighting, shifting entirely to warm ambient and accent sources. As you get closer to bedtime, you dim these sources further and transition to light that is physically lower in the room, ideally at floor level. This mimics the final embers of a fire, a primal signal of safety and rest.
Programming this sequence into a smart lighting system is the most effective way to ensure consistency. A “Sunset Scene” that automates this fade over 60-90 minutes removes the guesswork and turns a biological necessity into a seamless, atmospheric ritual. The following checklist provides a precise, step-by-step plan for implementation.
Your Action Plan: The 90-Minute Circadian Shutdown Sequence
- T-90 minutes: Eliminate all task lighting above 3000K. Switch to warm ambient sources only to begin the transition away from alertness signals.
- T-60 minutes: Dim all lights to below 50 lux (approximately a 30% dimmer setting). Shift all remaining active bulbs to 2700K or warmer to reduce blue light exposure.
- T-30 minutes: Transition to the ’ember light’ phase. Activate only red-spectrum or sub-2200K lighting, preferably at or below knee-height, mimicking firelight.
- T-15 minutes: Initiate an optional ‘light fasting’ period. Use only indirect, candlelight-equivalent sources (5-10 lux) for a full melatonin reset before entering the bedroom.
- System Integration: Program this entire sequence into your smart lighting system as a ‘Sunset Scene’ with a 60-minute automated fade for effortless nightly execution.
Why Your Bathroom Light Is Waking You Up More Than Espresso?
A middle-of-the-night trip to the bathroom can completely derail your sleep, and the culprit is almost always the light. A standard bathroom vanity light is designed for high-visibility tasks like applying makeup, and as such, it is brutally effective at waking you up. In fact, lighting measurement studies reveal that typical vanity lighting emits 500-800 lux, a level that is up to 26 times higher than the scientifically established threshold for melatonin disruption. Flipping that switch is the equivalent of a neurological flashbang, instantly telling your brain it’s morning.
This single, high-intensity light source is a design failure in a room that serves two opposing functions: high-energy morning preparation and low-disruption nighttime use. The professional solution is not a dimmer on that one bright light, but a dual-circuit lighting system. This approach creates two independent lighting schemes within the same room, each tailored to a specific purpose. One circuit powers the bright, cool-toned task lighting for daytime, while a separate circuit powers a low-level, ultra-warm pathway light for nighttime.
This secondary circuit is the key. It typically uses low-wattage LED strips at floor level or behind the vanity to create an indirect glow of no more than 5-10 lux. The color temperature should be 2200K or even a pure red light, which has been shown to have the least impact on melatonin. Critically, this circuit should be activated by a motion sensor, so you never have to fumble for a switch. You get just enough light to see safely without shocking your system awake. The following table outlines how to structure this superior approach.
| Circuit Type | Light Level (Lux) | Color Temperature | Placement | Activation |
|---|---|---|---|---|
| Morning/Day Circuit | 300-500 | 3500K-4000K | Vanity/ceiling | Manual switch |
| Night Pathway Circuit | 5-10 | 2200K or red | Floor level/baseboard | Motion sensor |
| Transition Circuit | 50-100 | 2700K | Indirect/cove | Dimmer control |
How to Test Pastels so They Don’t Look “Muddy” in North-Facing Rooms?
The interaction between light and color is one of the most complex aspects of interior design, especially in rooms with challenging natural light. North-facing rooms receive cool, indirect light throughout the day, which can dramatically alter how paint colors appear. Pastels, in particular, are notorious for looking “muddy,” flat, or completely different from the swatch. This happens because the cool natural light lacks the warmer red and yellow parts of the spectrum, and if your artificial light source also has a poor Color Rendering Index (CRI), the color can be distorted beyond recognition.
A design project for a north-facing bedroom illustrates this perfectly. The chosen sage green paint appeared dull and muddy under standard 2700K LED bulbs with a low 80 CRI. The warm, yellow-toned artificial light was fighting the cool-toned natural light, neutralizing the paint’s subtle vibrancy. The solution was counter-intuitive: instead of adding more warmth, the designer switched to 3500K bulbs with a 97 CRI. The neutral white light brightened the room and, critically, the high-CRI bulb rendered the missing parts of the color spectrum that the north-facing light lacked. The true pastel tones emerged, looking vibrant and accurate throughout the day.
You can avoid costly repainting by creating your own “Mobile Light Lab” to test colors accurately in your space. This simple but effective method allows you to see how your chosen colors will react to different artificial light sources at various times of day.
- Acquire high-CRI (>95) bulbs in multiple color temperatures: a warm 2700K, a neutral 3500K, and a cool 4000K.
- Mount each bulb in a portable clamp lamp for mobility.
- Paint large swatches (at least 2×2 feet) on the wall you intend to paint.
- Test each paint swatch with each bulb at different times: morning (with natural north light), noon, and evening (with only artificial light).
- Position the lamp at the same angle as your planned fixtures. Document each combination with photos to compare side-by-side.
Key Takeaways
- Effective lighting is a symphony of three layers: Ambient (safety), Task (focus), and Accent (emotion).
- Mix Kelvin temperatures vertically to avoid visual clashes: cooler light above eye-level, warmer light at or below.
- Embrace “Intentional Shadow” by using wall-mounted and floor-level fixtures instead of relying solely on overhead pot lights.
How to Create a “Hygge” Corner to Combat Seasonal Affective Disorder
Creating a “Hygge” corner—that Danish concept of a cozy, comfortable, and content-making space—is more than just adding a soft blanket. It’s an exercise in multi-sensory design, and lighting is its heart. For those who experience the low mood and energy of Seasonal Affective Disorder (SAD), this corner can become a powerful therapeutic tool. The key is to combine the principles of atmospheric lighting with the proven benefits of light therapy.
First, integrate function. The corner’s “task” lighting during the morning should be a dedicated 10,000-lux SAD therapy lamp. A 30-minute session while reading or drinking coffee can be profoundly effective. In fact, clinical light therapy research indicates that combining 10,000-lux morning therapy with warm ambient lighting later in the day can reduce SAD symptoms by as much as 67%. This dual approach tackles the biological need for bright light in the morning and the psychological need for warmth and coziness in the evening.
For the rest of the day, the lighting should be a rich tapestry of warm tones. This isn’t about one lamp, but multiple sources creating a layered glow. A successful Hygge corner includes:
- An Ambient Base: At least three sources of very warm (2200K) light at varying heights—a table lamp, a floor uplighter, and perhaps a string of delicate fairy lights.
- A Dynamic Element: The human brain is comforted by randomized, natural patterns. High-quality LED candles or a digital fireplace display provide a gentle flicker that triggers primal comfort responses.
- Textile Integration: The light should interact with its surroundings. Use soft, textured materials like wool throws and velvet pillows that catch and diffuse the warm light, enhancing the sense of coziness.
- Sensory Pairing: Amplify the effect by pairing your warm light scenes with complementary scents (clove, cedarwood) and sounds (brown noise, crackling fire audio) to create a fully immersive sanctuary.
Now that you understand the principles of layering, temperature, and control, the final step is to apply this knowledge to create cohesive lighting scenes that serve your life. Start by auditing one room and identifying its different functions. Then, begin building your layers, starting with a foundation of warm ambient light. Your goal is to move from a space that is simply lit to a home that feels intuitive, responsive, and deeply personal. To put these concepts into practice, the next logical step is to map out your own lighting scenes on paper before purchasing any new fixtures.